Instructions : Cased Object Housing Units
Handling of Cased Objects
Always handle with care but take into consideration whether cased object is:
- intact
- damaged (e.g. preserver or glass, missing or compromised seal)
- in multiple sections
- missing components
Materials / Tools
Materials
- 2-ply mat board
- corrugated blue board (single wall)
- double-sided tape
- Solander box (large enough to fit the cased object)
- fabric ribbon: twill or cotton tape
- fabric: unbleached 100% cotton muslin
- scavenger for oxidative gases: anti-tarnish silver cloth (optional)
- Ethafoam, 48 x 54 x 1 inch, white
- Volara polyethylene foam, 1 inch, white
Tools
- Xacto-knife, scalpel
- spatula
- scissors
- ruler
- pencil
Materials and Specifications
Mat board
- 2-ply, traditional construction
- 100% cotton fibre
- solid colour throughout
- buffered with calcium carbonate
- naturally acid and lignin free
- passed the Photographic Activity Test (PAT)Footnote 1
Solander box
- acid-free materials
- one-piece clamshell construction
- moisture-resistant black cloth covering
Twill or cotton tape
- natural colour
- strong enough for the weight of the cased object
Muslin
- unbleached, 100% cotton
- before using, wash with organic detergent
Anti-tarnish silver cloth
- never wash or wet anti-tarnish silver cloth
- never use sulfur-based glue or rubber cement to adhere anti-tarnish silver cloth
Ethafoam
- 48 x 54 x 1 inch, white
- needs to be flat
- Ethafoam brand is a polyethylene product
Volara polyethylene foam
- 1 inch, white
- needs to be flat
- Type A Volara is an archival safe polyethylene foam
Filmoplast® P90 tape
Measuring and Cutting
- Cut Ethafoam height and width to fit box, leaving no space.
- Cut depth of Ethafoam minus the thickness of a piece of corrugated blue board (single wall). (This will be the thickness of the silver cloth scavenger.)
- Centre case onto the Ethafoam.
- Mark the four corners of the case onto the Ethafoam.
- Cut out a hole the size of the case from the Ethafoam to make the base.
- Save cut-out piece for later.
- Place the Ethafoam base onto a piece of Valara polyethylene foam, and on this piece draw in pencil the inner contour of the base of Ethafoam.
- Cut the Valara to the same size as the hole in the Ethafoam base.
- Place the Valara into the hole in the Ethafoam base.
- Cut a continuous indent the thickness of one blade on top of the Ethafoam base.
- Make the indent 1 cm from the centre cut hole, around the entire hole.
- Place the unbleached cotton muslin fabric onto the Ethafoam base.
- Place the cut out piece of Ethafoam onto the fabric and press down.
- Trim the excess fabric, which hangs over the sides of the Ethafoam base.
Assembly
- Keep cut-out piece of Ethafoam in the base.
- Using a soft-edge blade, insert the exterior sections of the cotton muslin fabric into the indentation made previously.
- Remove the Ethafoam cut out.
- Place the piece of Valara in the back of the Ethafoam base.
- Adjust slightly the cotton muslin fabric.
- With the soft edge blade, insert the extra cotton muslin fabric between the Ethafoam base and the Valara.
- With a sharp knife make a small hole along the outside edge of the indentation on the Ethafoam base to the back.
- Measure the cotton twill/tape (approximately 30 cm, depending on the size of the case) and insert into the hole.
- Knot in the back of the cotton twill/tape and cut off extra.
- Insert knot into the back of the Ethafoam base.
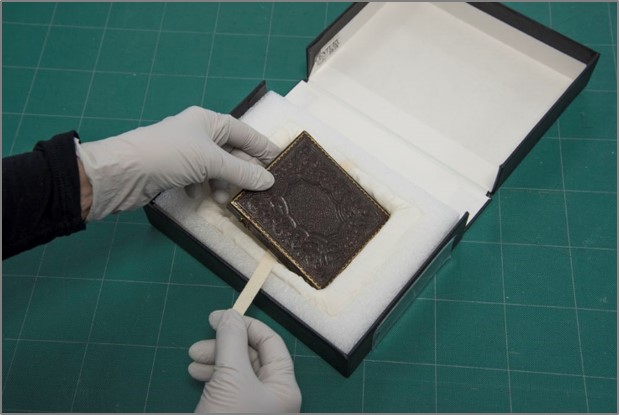
- Turn the base around, and with a soft blade, tuck cotton twill/tape in between Ethafoam base and Valara on the cotton fabric. Lay the remaining twill/tape along the bottom against the cotton muslin fabric and around to the opposite side.
- Leave approximately 7 cms hanging out of the base as this will be the method of lifting the cased object out of the storage unit.
Anti-tarnish Silver Cloth (optional)
- Cut the mat board slightly smaller than the box lid. Cut the silver cloth so it is 2.5 cm larger along all edges than the mat board.
- Place double-sided tape along the edges of the mat board, and turn the board to affix it to the cloth.
- Trim all corners of the silver cloth at a 45° angle.
- Fold the silver cloth around the mat board and secure tightly with double-sided tape.
- Place more double-sided tape onto the back of the mat board and the folded cloth.
- Double-sided tape up, place on top of the Ethafoam base in the Solander box.
- Close and press the box lid so that the double-sided tape affixes to the inside lid of the Solander box. This is the only step with adhesive and is optional.
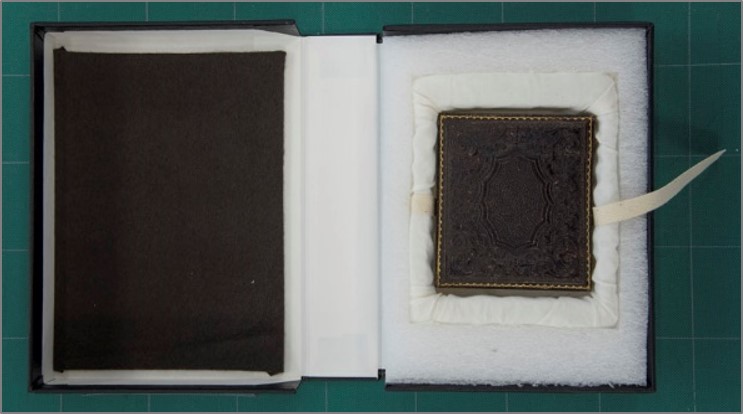
Completed Cased Object Housing Units
Without silver cloth scavenger
With silver cloth scavenger
For more information about this cased object, see Library and Archives Canada Collection.
Tray (optional)
Sometimes the case is broken or missing components. If this is the case, then a mat board tray can be made to aid in the removal of the cased object from the housing unit.
- Mark the corners of the case onto 2-ply mat board for the base measurements.
- Add the height of the case to the outside dimensions. If there are clasps, add the depth of the clasps to the clasp side only.
- Score the base measurements with a sharp knife and a ruler.
- Cut out the four corners.
- Tape two edges together with Filmoplast® P90 tape.
- Place cased object into mat board tray.
- Place tray into the cased object housing.
Acknowledgements
Tania Passafiume
Head Conservator of Photographic Materials
Carla Klück
Digitization Project Co-ordinator (acting)
Nicole Fleury
Digital Imaging Specialist (acting)
Christopher Smith
Collections Management Clerk
Ken LaGrave
Collections Management
Clerk Anna Lehn
English Editor
Special thanks to John McElhone